Deploy a static site to AWS S3 and CloudFront using AWS CDK
Table of Contents
Prerequisites #
- Node.js (LTS recommended), Git and TypeScript (globally via npm) installed
- Have an AWS account and access to the AWS Management Console
Todo #
-
Create a demo static site
build a site to a ready-to-deploy folder, I will be using Hugo today, but any framework of your choice will suffice -
Setup a new AWS CDK project
install everything AWS CDK related, configure AWS credentials and set up a new CDK TypeScript project -
Define AWS resources for the deployment
deep dive into the CDK app, take a look at stacks and define all the necessary CDK constructs for a static site deploy (s3.bucket,cloudfront.Distribution, etc.) -
Deploy the site
run our first deployment with the CDK Toolkit commands, view the deployed stack and resources inside the AWS Management Console -
Security and Domain Name
scan our site with Mozilla Observatory and improve our grade by registering a domain name, enabling HTTPS, adding a certificate and setting security headers
Create a demo static site #
For the purposes of this tutorial, we will not be focusing on fine-tuning the site contents. Today, I will be deploying a simple static blog and have chosen to use Hugo as my framework (other popular alternatives for this purpose include 11ty, Astro, and Jekyll). I don’t need any complex user interactions, so a static site generator is sufficient for my needs.
If you plan to use Hugo as well, make sure it is installed on your machine. Then, open up a terminal (on Windows, it’s recommended to use an Unix command line terminal or Powershell; Git Bash is usually the easiest option),
and run
hugo version
# hugo v0.103.0+extended darwin/arm64 BuildDate=unknown
to verify your installation. You should get a similar output to the one above.
Now that the hard part is done, we can generate our site by running
hugo new site my-blog
Running the command above should generate a new my-blog folder within the current directory. Let’s move inside that folder and pull in a theme from GitHub (you can see a full list of available themes
here). I’ll be using the
Paper theme today
cd my-blog
git init
git submodule add https://github.com/nanxiaobei/hugo-paper themes/paper
You should see a new subfolder under themes, in my case it is called themes/paper. Since we are using Git submodules to manage themes, you should also see a new .gitmodules file being generated in the root directory.
While we’re at it, let’s also add a .gitignore file for Hugo. Create a new file
touch .gitignore
Similar to other frameworks, we do not want to include any build files or automatically generated files in our repository. In Hugo, the build folder is called /public by default, so let’s add that to our .gitignore file to exclude it from version control
# Generated files by hugo
/public/
# Temporary lock file while building
/.hugo_build.lock
Now that we’ve taken care of the Git-related stuff, let’s apply the theme to our project. To do this, we just need to add a new line to the configuration file. Open up config.toml and add the following line
theme = "paper"
To add some content, use the new command to create a new Markdown file inside the content folder
hugo new posts/my-first-post.md
Hugo has excellent Markdown support and will automatically convert the contents of the file into a new page at /posts/my-first-post/. Let’s verify that by starting up Hugo’s development server:
hugo server -D
# ...
# Web Server is available at http://localhost:1313/
# ...
When you start the server, you should see some basic information output to the terminal. Look for the localhost URL. If you are not running anything on Hugo’s default
port (1313), the site should now be available at that URL. Open it up in a browser. With the Paper theme, the posts should also be visible on the home page by default. Visit /posts/my-first-post and edit the /content/posts/my-first-post.md file, then save your changes. Hugo should rebuild the site without stopping the server, and you should see your changes reflected on the site.
All right we are ready to ship this thing 🚀, run
hugo -D
By default, when you use hugo new to create a new post, Hugo treats it as a draft and sets the draft: true flag. To include content marked as a draft in the build, we need to specify the -D option. All of the build files will be located in the /public directory, and they should be ready to deploy.
Done.
- Create a demo static site
Setup a new AWS CDK project #
To simplify interactions with AWS services, consider installing the AWS CLI. This will provide you with a set of command-line tools that allow you to easily manage your AWS resources from the terminal.
Access keys consist of an access key ID and secret access key, which are used to sign programmatic requests that you make to AWS. If you don’t have access keys, you can create them from the AWS Management Console.
Before we can use the AWS CDK, we need to set up AWS credentials for our account. There are several ways to do this, but for our purposes, we will use the “Creating a key pair” method as described in the AWS documentation. Here’s how to do it, sign in to the AWS Management Console and
- Open the IAM console.
- In the navigation pane, choose Users and click the Add Users button.
- Type in a User name for the key pair, I’m going with “my-blog-cdk”. Check Access key - Programmatic access as the AWS credential type and hit Next: Permissions.
- Now, you could dive deeper with permissions in this step if you have to take security a bit more serious, I’m going to keep it simple, select Attach existing policies directly and check AdministratorAccess. Click Next: Tags.
- We can skip Tags and click Next: Review.
- Finally click Create user.
- Now you can either download the .csv file and use that for the configuration or simply copy-paste the access key ID and secret access key pair. ❗ Be careful with exposing the keys if you followed my steps and chose AdministratorAccess for permissions, since anyone could access your AWS resources with the key pair.
Now that we have our AWS credentials, we can configure them for use with the AWS CDK. The easiest way to do this is to run the AWS CLI
configure command. On MacOS, the configuration file will be stored at ~/.aws/credentials, so you may need to use sudo to run this command (for more information on configuration and credential file settings, see this
page). Alternatively, you can create the .aws files manually if you are not using the AWS CLI
sudo aws configure
# AWS Access Key ID [None]: AKIAIOSFODNN7EXAMPLE
# AWS Secret Access Key [None]: wJalrXUtnFEMI/K7MDENG/bPxRfiCYEXAMPLEKEY
# Default region name [None]: us-east-1
# Default output format [None]: json
When prompted, enter your access key ID and secret access key from the key pair that you created earlier. For the region name, enter us-east-1, and for the output format, enter json. If you run aws configure again or cat ~/.aws/credentials, you should see your configured credentials.
Alright we got the keys 🔑, let’s move on and install the
AWS CDK Toolkit (globally) with npm
npm install -g aws-cdk
If you were following the previous todo, our project folder structure currently looks something like this
my-blog
│   ...
├── public # Hugo build folder
│   ...
└── .gitignore
The name of the build folder (in this case, public) is not particularly important, but it’s important that we specify the correct path to the folder when we configure our deployment later. Let’s create a new cdk folder at the same level as the public folder and initialize a new empty CDK project using the
cdk init command
mkdir cdk
cd cdk
sudo cdk init app --language typescript
In addition to other generated files and folders, we should focus on the cdk.json file first. This is a
configuration file for the CDK, and it tells the CDK Toolkit how to execute our app. It contains information such as the programming language being used, the app’s entry point, and other runtime settings.
If one of
cdk.jsonor~/.cdk.jsonexists, options specified there will be used as defaults. Settings incdk.jsontake precedence.
When we choose TypeScript as the programming language with cdk init, it sets the app option to "app": "npx ts-node --prefer-ts-exts bin/cdk.ts",. This specifies the command that will be used to execute the CDK application.
The command specified in the app option uses
ts-node by default, which is an execution engine for Node.js that allows you to run TypeScript code directly. The --prefer-ts-exts flag prevents ts-node from prioritizing precompiled .js files and will always import the TypeScript source code instead, if it is available. This is useful if you are also using tsc (the TypeScript compiler) alongside the app option. The bin/cdk.ts file is the entry point for our CDK app, which defines the main function that will be executed when the app is run.
To make it easier to use certain values throughout our CDK app, let’s define some environment variables. Create a new .env file inside the cdk folder and add the following lines (we will use these later)
CDK_REGION=us-east-1
# Add your AWS Account ID here,
# can be grabbed from AWS Management Console when,
# clicking on your profile in the top right dropdown
CDK_ACCOUNT=2383838383
# Optional, if you are planning to purchase or have a domain
# ready to use
DOMAIN_NAME=e53nec.com
Even though our .env file does not contain any sensitive information, it is a good practice to exclude it from version control. To do this, open the cdk/.gitignore file and add the following line
# env files
.env*
To make it easier to access the environment variables defined in the .env file, we will use the
dotenv module. This module loads environment variables from a .env file into our CDK app. To install dotenv, run the following command
npm install dotenv --save
To use dotenv in our CDK app, we need to import and configure it in the entry point file (bin/cdk.ts). At the top of this file, add the following lines
import * as dotenv from 'dotenv'
dotenv.config()
...
import * as cdk from 'aws-cdk-lib'
This will import the dotenv module and use the config function to load the environment variables from the .env file. We will be able to access these variables throughout our CDK app using process.env.VARIABLE_NAME.
To verify that the environment variables are being loaded correctly, we can log them to the console and execute the app with ts-node. Inside bin/cdk.ts, add the following line below the dotenv configuration
console.log(process.env.CDK_REGION) // Remove if it's working
...
const app = new cdk.App() // Initialize a CDK application
and run
npx ts-node bin/cdk.ts
You should see us-east-1 printed to the console. Now that we have set up our CDK project and configured the environment variables, we are ready to start building our CDK app by writing CDK constructs.
Done.
- Setup a new AWS CDK project
Define AWS resources for the deployment #
At the top level of every CDK App we define one or multiple
stacks. Stacks are units of deployments, they are used for organizing and grouping the AWS resources together to a single deployment. In a TypeScript CDK app, any instance of the cdk.Stack class represents a stack. You can see an example of this with the CdkStack class in the bin/cdk.ts file
...
import { CdkStack } from '../lib/cdk-stack';
...
new CdkStack(app, 'CdkStack', {
  // ...
})
The CdkStack class extends the root cdk.Stack class, which is imported from the aws-cdk-lib module in the lib/cdk-stack.ts file. This allows us to define custom behavior for our stack in addition to the functionality provided by the base cdk.Stack class
export class CdkStack extends cdk.Stack
Inside stacks, we define constructs, which are the basic building blocks of a CDK app. Constructs represent a cloud component (I’m going to use the terms construct and components interchangeably), such as an S3 Bucket or a CloudFront Distribution. These components are turned into AWS resources after the CDK app is deployed.
For those who prefer visual representations, the composition of an app with stacks and constructs can be summarized with the following diagram from the AWS docs
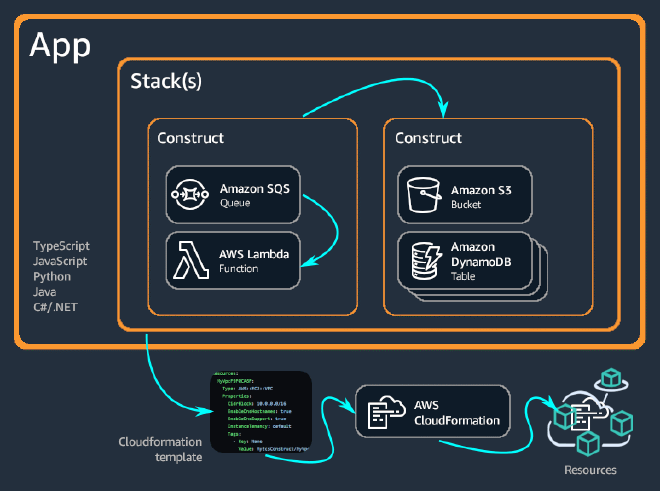
We are now going to add some constructs to our stacks. The following structure is optional, but we will define a BaseStack which will contain all the components that can be reused across multiple site deployments and a BlogStack for components specific to our blog. This separation of reusable and specific components allows for greater flexibility and modularity in our app in case we plan on having multiple deployments in the future.
Let’s rename the file lib/cdk-stack.ts to lib/base-stack.ts and the exported CdkStack class to BaseStack. We will remove all unnecessary comments and add our first construct to the BaseStack, which will be the storage for the site: an
S3 Bucket 🪣
import * as cdk from 'aws-cdk-lib'
import * as s3 from 'aws-cdk-lib/aws-s3'
import { Construct } from 'constructs'

export class BaseStack extends cdk.Stack {
  private _bucket: s3.Bucket

  constructor(scope: Construct, id: string, props?: cdk.StackProps) {
    super(scope, id, props)
    this._bucket = new s3.Bucket(this, 'BaseBucket')
  }
}
Constructs are implemented in classes that extend the Construct base class. You define a construct by instantiating the class.
We have instantiated the s3.Bucket class, thus defining a new Bucket construct. Inside our BaseStack, we will also define private properties for the constructs. These will be exposed and passed down to the child BlogStack later. All constructs take three parameters when they are initialized: the scope, the id, and the props
new s3.Bucket(this, 'BaseBucket', {})
- scope - The first parameter is the
scope, which is the construct’s parent or owner. This can be either a stack or another construct (in our case, theBaseStackwill be the owner of theBucketconstruct). In JavaScript (TypeScript), we use thethiskeyword to represent the current object for the scope. - id - The second parameter is the
id, which is a unique identifier within the current scope. - props - The third parameter is the
props, which is a set of properties that define the construct’s configuration. In most cases, constructs provide sensible defaults, and if allpropselements are optional, you can omit thepropsparameter completely (which is what we did with the bucket above).
The first two parameters will be repetitive across the whole CDK app. To keep the construct ids unique, I will use this simple StackNameConstructName pattern.
When deploying a static site to the S3 bucket, we could either
-
Enable static website hosting by adding the
websiteIndexDocumentproperty to our Bucket construct. This would require changing the defaults and some additional configuration when serving the site with CloudFront.
If the bucket is configured for website hosting, the CloudFront origin will be configured to use the bucket as an HTTP server origin and will use the bucket’s configured website redirects and error handling. Otherwise, the origin is created as a bucket origin and will use CloudFront’s redirect and error handling.
- Keep the
s3.bucketas a bucket origin for CloudFront.
We are going to stick with the defaults and continue with the 2nd (bucket origin) option. We could pretty much achieve the same final result with the first one (see using a website endpoint as the origin). There are also some caveats to both options, we will go through the latter ones.
The
default props for the Bucket should then just work fine. The only interesting ones to us are the blockPublicAccess and the removalPolicy properties. If you are only playing around and plan on destroying the bucket later make sure to modify the removalPolicy and the autoDeleteObjects properties based on your needs
// This will also destroy the bucket when running cdk destroy later
this._bucket = new s3.Bucket(this, 'BaseBucket', {
  removalPolicy: RemovalPolicy.DESTROY,
  autoDeleteObjects: true,
})
To allow users to access the site’s content through CloudFront, we can add another construct called an OriginAccessIdentity. This is a special CloudFront user that can be associated with an S3 bucket origin. Since the default for blockPublicAccess is s3.BlockPublicAccess.BLOCK_ALL, this is necessary.
import { aws_cloudfront as cf } from 'aws-cdk-lib'
...
export class BaseStack extends cdk.Stack {
  ...
  private _originAccessIdentity: cf.OriginAccessIdentity
  ...
  this._originAccessIdentity = new cf.OriginAccessIdentity(this, 'BaseCfOriginAccessIdentity')
}
Next, we need to grant our Origin Access Identity (OAI) bucket read permissions. We can do this by adding the user to the bucket resource policy with the addToResourcePolicy() method, passing in a new IAM statement and attaching our OAI to the policy statement principals.
import * as iam from 'aws-cdk-lib/aws-iam'
...
this._bucket.addToResourcePolicy(
  new iam.PolicyStatement({
    actions: ['s3:GetObject'],
    resources: [this._bucket.arnForObjects('*')],
    principals: [
      new iam.CanonicalUserPrincipal(
        this._originAccessIdentity.cloudFrontOriginAccessIdentityS3CanonicalUserId
      ),
    ],
  })
)
That should be all the permission stuff done. Now we have only have one little problem left that we can solve within our BaseStack.
If you have not been following from the beginning, I used Hugo to generate the site. I have this build folder structure (which is common when using static site generators) for my pages
public
│   ...
├── posts
│   └── my-first-post
│       └── index.html
│   ...
└── index.html
Since we chose the bucket origin option, we must request the file at /posts/my-first-post/index.html directly, and our page routing will not work (this should be handled automatically if the static website hosting option is enabled). However, if we want to access the posts using the /posts/my-first-post/ URL, we can use a
CloudFront Function to make this happen.
To begin, create a new folder called cdk/functions and add a new file to it called cdk/functions/reqRewrite.js. By default, a new CDK project includes a *.js line in the .gitignore file, which ignores all JavaScript files. In order to ensure that our function code is tracked and committed to the repository, we can add a new rule !/functions/*, which grabs back all of the .js files inside the functions directory.
In this file, we will rewrite all page requests by checking if the request does not contain a dot (e.g. .css, .js). This will help us determine if we are requesting a file or not. If the request does not contain a dot, it means that we are not requesting a file, and we can proceed with the rewrite and append .index.html to the requested URI
function rewritePageUri(uri) {
  var isDir = uri.endsWith('/')
  // Handle both "/posts/my-post/" and "/posts/my-post"
  return uri + (isDir ? '' : '/') + 'index.html'
}

function handler(event) {
  var request = event.request

  // Requesting a page ("/" or "/posts/my-post")
  if (!request.uri.includes('.')) {
    // Append index.html to the requested uri
    request.uri = rewritePageUri(request.uri)
  }

  return request
}
All the page requests will now serve the respective .index.html files.
my-page/index.html or similar. If you have a different build folder structure, you will need to modify the rewritePageUri() function so that it appends the correct .html file to the requested URI. This will ensure that the correct page is displayed when a user navigates to your site.
Let’s go ahead and attach our function to a CloudFront function associations list (we will drop this list into our CloudFront construct later). To do this, create a new _functionAssociations property and add a new construct as follows
...
export class BaseStack extends cdk.Stack {
  private _functionAssociations: cf.FunctionAssociation[]
  ...
  this._functionAssociations = [
    {
      eventType: cf.FunctionEventType.VIEWER_REQUEST,
      function: new cf.Function(this, 'BaseRequestRewriteFunction', {
        code: cf.FunctionCode.fromFile({ filePath: 'functions/reqRewrite.js' }),
      }),
    },
  ]
}
It is important to note that we need to create a VIEWER_REQUEST type function in order to modify the request before it reaches the origin(see
Introducing CloudFront Functions). To create a VIEWER_REQUEST type function, we can use the
Function construct, which allows us to specify the source code of the function from a file (such as the reqRewrite.js file we created earlier). We can also pass the code in as an inline string if we prefer.
In order to make our base stack resources accessible to other CDK stacks, let’s create and export a BaseStackInterface
...
export interface BaseStackResources {
  bucket: s3.Bucket
  originAccessIdentity: cf.OriginAccessIdentity
  functionAssociations: cf.FunctionAssociation[]
}

export class BaseStack extends cdk.Stack {
...
and add a public resources() method to the BaseStack
...
private _functionAssociations: cf.FunctionAssociation[]

resources(): BaseStackResources {
  return {
    bucket: this._bucket,
    originAccessIdentity: this._originAccessIdentity,
    functionAssociations: this._functionAssociations,
  }
}

constructor(scope: Construct, id: string, props?: cdk.StackProps) {
...
By doing this, we can ensure that our child stacks are able to leverage the resources created in the BaseStack, making our cdk project more modular and reusable.
Great, it looks like we have all the base resources we need. Now, let’s create our stack. To do this, open the bin/cdk.ts file and instantiate the BaseStack class as follows (make sure to use unique stack IDs if you are planning on deploying multiple CDK applications to the same AWS account)
import { BaseStack } from '../lib/base-stack'
...
const app = new cdk.App()
const baseStack = new BaseStack(app, 'AwsStaticSiteStarterBaseStack')
It is a good practice to ensure that our stacks are deployed to the desired account and region every time. To accomplish this, we can use the cdk.StackProps.env and retrieve the values from our .env file, and pass them as properties to our stacks. This approach is recommended for production environments, as it ensures consistency and eliminates potential issues that may arise when working with other team members who may have different accounts configured
...
const sharedProps: cdk.StackProps = {
  // Set the region/account fields of env to either a concrete
  // value to select the indicated environment (recommended for production stacks)
  env: { account: process.env.CDK_ACCOUNT, region: process.env.CDK_REGION },
}
const baseStack = new BaseStack(app, 'AwsStaticSiteStarterBaseStack', { ...sharedProps })
...
Now that we have finished preparing resources for the CloudFront construct, we can move on to creating our BlogStack.
To get started, create a new file called lib/blog-stack.ts and define a new class called BlogStack. The stack props should contain the additional BaseStackResources props. We can then destructure the props to get the individual resource instances as follows
import type { Construct } from 'constructs'
import type { BaseStackResources } from './base-stack'
import * as cdk from 'aws-cdk-lib'

export class BlogStack extends cdk.Stack {
  constructor(scope: Construct, id: string, props: cdk.StackProps & BaseStackResources) {
    super(scope, id, props)
    const { bucket, originAccessIdentity, functionAssociations } = props
  }
}
Now that we have defined our BlogStack class, we can create an instance of it inside bin/cdk.ts and pass in the resources as props
...
import { BlogStack } from '../lib/blog-stack'

...
new BlogStack(app, 'AwsStaticSiteStarterBlogStack', { ...sharedProps, ...baseStack.resources() })
To finish setting up the BlogStack, let’s go back to lib/blog-stack.ts and create a
CloudFront distribution. We are going to specify a few props here
defaultRootObject- The rootindex.htmlobject we want to request from the S3 origin when a viewer requests the root URL for our distribution.defaultBehaviorfunctionAssociations- The request rewrite function that we created earlier.origin- A newS3Originconstruct with our bucket and theoriginAccessIdentityfrom our base stack.
...
import * as origins from 'aws-cdk-lib/aws-cloudfront-origins'
import { aws_cloudfront as cf } from 'aws-cdk-lib'
...
const cfDistribution = new cf.Distribution(this, 'BlogCfDistribution', {
  defaultRootObject: 'index.html',
  defaultBehavior: {
    functionAssociations: [...functionAssociations],
    origin: new origins.S3Origin(bucket, {
      originAccessIdentity,
      originPath: '/blog',
    }),
  },
})
Finally, we will also need a
BucketDeployment construct to deploy our site to our S3 bucket (populate the S3 bucket with our public folder). As for the
props, the destinationBucket and the distribution are the obvious ones. The ones that need a little bit more attention would be
distributionPaths- The file paths to invalidate in the CloudFront distribution. This is important to specify because if the cache is not invalidated, users may continue to see the old content, which can lead to a variety of issues, such as incorrect display of content, broken links, JavaScript errors, etc.destinationKeyPrefix- This is to organize our objects in the bucket by placing them in a specific subdirectory (blog). In case we would want to deploy multiple apps to the same bucket, we could specify different prefixes for different apps.sources- Thesourcesproperty allows us to specify the files or directories that we want to deploy to the bucket. An array of ISource objects is expected, so we can use thes3deploy.Source.asset()with the node.jspath.join()to build the path to ourpublicdirectory.
...
import { join } from 'path'
import * as s3deploy from 'aws-cdk-lib/aws-s3-deployment'
...
new s3deploy.BucketDeployment(this, 'BlogBucketDeployment', {
  destinationBucket: bucket,
  distribution: cfDistribution,
  distributionPaths: ['/*'],
  destinationKeyPrefix: 'blog',
  sources: [s3deploy.Source.asset(join(__dirname, '..', '..', 'public'))],
})
The BaseStack and BlogStack structure that I chose should now be clearer. If we decide to deploy another site, we can easily reuse resources from the BaseStack and add an additional child stack (similar to or the same as the BlogStack) as needed. We can then modify the paths and prefixes as needed.
🎁 Caching Site Assets with AWS CDK & S3
Deploying to CloudFront CDN results in a significant improvement over other alternatives due to Amazon’s edge cache. To further improve our site performance, we must set
Cache-Control headers that control caching of our assets inside browsers. You may want to consider the snippet I provided above, which extends the BucketDeployment (drop-in
SiteBucketDeployment construct) with several additional properties that enable you to set different Cache-Control headers according to the specified file extensions.
Well that was easy, let’s ship this thing for real now.
Done.
- Define AWS resources for the deployment
Deploy the site #
If this is your first time deploying a CDK app on your AWS account, you may also need to run the cdk bootstrap command. This command creates the necessary resources in your account to support CDK deployments, such as an S3 bucket for storing templates and assets. A simple
cdk bootstrap
should work if your credentials are configured. You should also get a warning when trying to deploy without bootstrapping first.
There are also some useful commands that we can run to ensure that the cdk app is in good shape and we can catch any potential issues early on:
cdk diff- This command compares the current state of the application with the deployed state and shows you the differences between them. This can help you understand what changes will be made to your resources during the next deployment.cdk synth- Generates the CloudFormation template for your stack, which can be useful for reviewing the template, or even debugging and troubleshooting issues related to your stack deployment.
In addition to the built-in CDK commands, we can also include a custom build command to catch any errors or issues with the application’s code before deployment. Since it is not part of the CDK toolchain, and we are using ts-node, we can replace the build script in the package.json file with the command we used in the previous section
...
"scripts": {
  "build": "npx ts-node bin/cdk.ts",
},
...
and run
npm run build
Alright it’s finally time to deploy. As we have multiple stacks within the app, it is necessary to use the cdk deploy --all option when deploying our app
# sudo cdk deploy --all
cdk deploy --all
When deploying the CDK application for the first time, it may take a while as all the resources defined in the stacks will be created. During the deployment process, you may be prompted with confirmation messages, asking you to confirm the creation of certain resources.
If the deployment process is successful, you should see a green checkmark with the stack id in the console
...

✅ AwsStaticSiteStarterBlogStack

✨ Deployment time: 326.15s

...
Let’s explore the deployed resources in the AWS Management Console. We can first visit the AWS CloudFormation service that displays a list of all the stacks in our AWS account, along with the resources that are associated with each stack
- Open the AWS Management Console
- In the top navigation bar, click on the Services menu and search/select CloudFormation.
- In the CloudFormation console, you will see a list of all the stacks in your AWS account.
- To view the resources associated with a stack, click on the stack name.
We can also view the properties and status of each resource in our stack, as well as perform various actions such as updating or deleting the stack. This is particularly useful when integrating CDK into a continuous integration and deployment (CI/CD) workflow. If a deployment gets stuck, we can use the AWS Management Console to take manual action to fix the issue.
To access our deployed blog, we will need to use the URL provided by CloudFront. To find the HTTP URL of our CloudFront distribution
- Select/Search CloudFront from the services menu.
- In the CloudFront console, you will see a list of all the CloudFront distributions in your AWS account.
- Click on the distribution that was created by your CDK app.
- In the distribution details page, you will see the Domain Name of the distribution, and it will take the form of xxxxxxx.cloudfront.net. We can use this URL to access our blog using HTTP. Go ahead and paste the url inside your browser.
If you are not using Hugo as we did in the first section, your site may already be working as intended. With Hugo it should be completely broken at this stage, we have to go back to our config.toml and update the
baseURL with our generated URL
baseURL = 'http://xxxxxxx.cloudfront.net'
...
Let’s rebuild and redeploy the site again (make sure you are inside the root directory)
hugo -D
cd cdk
cdk deploy --all
The redeploy should be noticeably quicker this time because we are only updating the contents of the site, not the constructs.
🎉 That’s it!
cdk diff command shows changes to the AWS::Cloudfront::Function .zip, one solution is to make a small modification to the function code, such as adding a comment. Another option is to use the inline version of the function code when creating the CloudFront function. This may resolve the issue and allow for successful redeployment.
For those of you that are only playing around and don’t want to keep the deployed stacks, you can use the cdk destroy command to delete all the resources that were created by the deployment. You might have to edit and redeploy the s3.bucket construct (the bucket needs to be empty) so that it gets properly destroyed
this._bucket = new s3.Bucket(this, 'BaseBucket', {
  removalPolicy: RemovalPolicy.DESTROY,
  autoDeleteObjects: true,
})
and run
cdk destroy --all
Alternatively you can also delete the contents of the bucket inside the AWS Management console and destroy the stack manually with CloudFormation.
If you have purchased a domain through AWS and want to take your site to production by enabling HTTPS, this final section below is for you. Even if you are not planning to purchase a domain at this time, you may still want to read along to learn about how to set up HTTPS and other security related features using the CDK.
Done.
- Deploy the site
Security and Domain Name #
Let’s evaluate the security of our site by using
Mozilla Observatory to obtain a security grade. Simply paste your CloudFront http://xxxxxxx.cloudfront.net/ URL to the input. At this stage, it is likely that we will receive an “F” rating, similar to a failing grade in college. However, unlike academic studies, it does not require extensive effort to improve our score. The most important and immediate step is to implement HTTPS, which is now a standard even for websites that do not transmit sensitive data. Failure to do so can result in Google Chrome flagging the website as insecure, which is not an acceptable outcome for a publicly accessible site.
Before diving deep into certificates and HTTPS, we can perform a security checklist by following the suggestions of Mozilla Observatory. One way to do this is by using the ResponseHeadersPolicy construct to add several security headers to our CloudFront distribution
These headers include (checkout the Web Security Cheat Sheet for more details, the importance and implementation difficulty of each one):
Content-Security-Policy- used to restrict the resources that a browser can load for a given pageContent-Type-Options- prevents the browser from interpreting files as something other than declared by the content typeFrame-Options- prevents clickjacking by ensuring that the content is not embedded into other sitesReferrer-Policy- allows us to control the value of the referrer headerStrict-Transport-Security- used to enforce secure connections to the serverX-XSS-Protection- helps prevent cross-site scripting attacks
Go back to our cdk/lib/base-stack.ts and create the ResponseHeadersPolicy construct (we will skip CSP in this article)
export interface BaseStackResources {
  ...
  responseHeadersPolicy: cf.ResponseHeadersPolicy
}

export class BaseStack extends cdk.Stack {
  ...
  private _responseHeadersPolicy: cf.ResponseHeadersPolicy

  resources(): BaseStackResources {
    return {
      ...
      responseHeadersPolicy: this._responseHeadersPolicy,
    }
  }

  constructor(scope: Construct, id: string, props?: cdk.StackProps) {
    ...
    this._responseHeadersPolicy = new cf.ResponseHeadersPolicy(this, 'BaseResponseHeadersPolicy', {
      responseHeadersPolicyName: 'CustomBaseResponseHeadersPolicy',
      securityHeadersBehavior: {
        /**
         * @todo ResponseHeadersPolicy CSP (for you, in case you want to have * a perfect grade)
         *
         * When using Hugo, implementing a proper Content Security Policy (CSP) can be
         * challenging when there is limited control over the scripts included on the site.
         */
        // contentSecurityPolicy: { contentSecurityPolicy: 'default-src https:;', override: true },
        contentTypeOptions: { override: true },
        frameOptions: { frameOption: cf.HeadersFrameOption.DENY, override: true },
        referrerPolicy: {
          referrerPolicy: cf.HeadersReferrerPolicy.NO_REFERRER,
          override: true,
        },
        strictTransportSecurity: {
          override: true,
          accessControlMaxAge: Duration.days(365 * 2),
          includeSubdomains: true,
          preload: true,
        },
        xssProtection: { override: true, protection: true, modeBlock: true },
      },
    })
    ...
Before proceeding further, ensure that your domain name is registered with Amazon Route 53. This process also creates a hosted zone with your domain name as part of the registration. You can follow the guide How to Register a Domain Name with Amazon Route 53) if you haven’t done so already.
We can utilize the HostedZone.fromLookup() method to create a HostedZone construct, which is required to specify for our certificate. Simply pass in your domain name, which should also be stored in the .env file at this point if you have been following the guide from the beginning
...
import * as route53 from 'aws-cdk-lib/aws-route53'
...
export interface BaseStackResources {
  ...
  zone: route53.IHostedZone
}

export class BaseStack extends cdk.Stack {
  ...
  private _zone: route53.IHostedZone

  resources(): BaseStackResources {
    return {
      ...
      zone: this._zone,
    }
  }

  constructor(scope: Construct, id: string, props?: cdk.StackProps) {
  ...
  this._zone = route53.HostedZone.fromLookup(this, 'BaseHostedZone', {
    domainName: process.env.DOMAIN_NAME ?? '',
  })
Next, we will once again proceed to the lib/blog-stack.ts file to bring everything together in our CloudFront distribution. We can retrieve the zone and responseHeadersPolicy constructs we created previously from the props. We can also grab the shared env prop for the region. Additionally, let’s assign the value of process.env.DOMAIN_NAME to a variable, as we will be using it in multiple places within the BlogStack.
...
super(scope, id, props)
const { env, zone, responseHeadersPolicy, bucket, originAccessIdentity, functionAssociations } = props
const domainName = process.env.DOMAIN_NAME ?? ''
...
Alright, let’s pass in the base stack constructs and specify some additional parameters for the CloudFront distribution. These include:
-
defaultBehavior.responseHeadersPolicy - this is where we will pass in our
responseHeadersPolicyconstruct -
defaultBehavior.viewerProtocolPolicy - set to
cf.ViewerProtocolPolicy.REDIRECT_TO_HTTPSto redirect all HTTP requests to HTTPS -
priceClass - set to
cf.PriceClass.PRICE_CLASS_ALLfor all CloudFront locations -
domainNames - an array containing our site’s domain name, passed in as
[domainName] -
certificate - it is necessary to specify the certificate that should be used for HTTPS connections. This is done by passing in an instance of the
Certificateconstruct as a property of theDistributionconstruct. The certificate is then associated with the distribution, and CloudFront uses it to authenticate connections to our website. The certificate must be located in N. Virginiaus-east-1. -
errorResponses - CloudFront, with our configuration, will return a
403error for any missing requests. This includes the standard404page responses. To properly handle these errors, we can use this behavior to remap the response and return a/404.htmlpage. Keep in mind that this page must exist on your site.
...
import * as acm from 'aws-cdk-lib/aws-certificatemanager'

...

const cfDistribution = new cf.Distribution(this, 'BlogCfDistribution', {
  defaultRootObject: 'index.html',
  defaultBehavior: {
    functionAssociations: [...functionAssociations],
    origin: new origins.S3Origin(bucket, {
      originAccessIdentity,
      originPath: '/blog',
    }),
    responseHeadersPolicy,
    viewerProtocolPolicy: cf.ViewerProtocolPolicy.REDIRECT_TO_HTTPS,
  },
  priceClass: cf.PriceClass.PRICE_CLASS_ALL,
  domainNames: [domainName],
  certificate: new acm.DnsValidatedCertificate(this, 'BlogCertificate', {
    domainName,
    // Support www. + domain name
    subjectAlternativeNames: ['www.' + domainName],
    hostedZone: zone,
    region: env?.region,
  }),
  errorResponses: [{ httpStatus: 403, responseHttpStatus: 404, responsePagePath: '/404.html' }],
})
Next up: an ARecord. An alias record in Route 53 is a type of record that can be used to map a domain name to selected AWS resources, such as an Elastic Load Balancer, CloudFront distribution, or an S3 bucket. We can use this construct to map our domain name to a CloudFrontTarget
...
import * as route53 from 'aws-cdk-lib/aws-route53'
import * as route53targets from 'aws-cdk-lib/aws-route53-targets'

...
new route53.ARecord(this, 'BlogAliasRecord', {
  zone,
  recordName: domainName,
  target: route53.RecordTarget.fromAlias(new route53targets.CloudFrontTarget(cfDistribution)),
})
Not crucial, but we can also use the
HttpsRedirect construct to redirect requests made to the www version of our domain to the non-www version. This is often done to ensure that users accessing our site are directed to a consistent URL, and to improve SEO. By using this construct, we can easily configure a redirect from www.domainName.com to domainName.com for all requests made to our site
...
import { aws_cloudfront as cf, aws_route53_patterns } from 'aws-cdk-lib'

...
new aws_route53_patterns.HttpsRedirect(this, 'BlogWwwToNonWww', {
  zone,
  recordNames: ['www.' + domainName],
  targetDomain: domainName,
})
The construct uses CloudFront and S3 behind the scenes, so an additional CloudFront distribution and S3 bucket will be created.
That should be everything we need for now. Let’s try a redeploy with the command cdk deploy --all. If the deployment is successful, you should be able to access your site at your purchased domain over HTTPS.
After deploying our CDK app, we can view the created certificate in the AWS Certificate Manager and the created records inside the hosted zone in the AWS Route 53 service.
Let’s also run a scan on the site using Mozilla Observatory again. We should see an improvement in the security grade, and should now receive a grade of “B” this time.
🥳 Here’s the final result e53nec.com.
Done.
- Security and Domain Name